
After my post last week, ‘Design to Stitch’, I thought I’d share one of the simple ways I design – one that I found works especially well for me – it might for you too.
Because that transition from concept to stitch is the hardest and most daunting part of the design process. It’s a giant leap of faith that says I can do this.
It starts with research as I’m trying to emulate an underwater garden so I need some sort of reference – just something I know I could draw and replicate in stitch.
Simplicity is key here – it has to have a simple shape – or be easily modified into a simple shape because my drawing skills are limited.
And that’s the trick – anything that doesn’t fit within those parameters, I dismiss. However, if they do, I have no problem pushing them in different directions, adding or taking away, making them larger or smaller or even part of another – I’ll go wherever my imagination takes me.
These simple shapes often end up becoming quite intricate, which is intriguing. I take away, but then I give back.
The design begins with a rough drawing using a felt tip pen – just loose lines and shapes trying to capture the essence of the image I have in front of me, but using it as a guide only – running in different directions if that’s where I want to go. And I may make two or three drawings adding different ideas to each.
I like to note the colours and the stitches I’ll be using – nothing fancy – just simple notations to jog my memory. If I’m feeling super excited I might even colour it in – but that’s not really necessary – and it doesn’t mean I have to stick with those choices.
With a small repertoire of simple embroidery stitches I use time and again, I find it’s useful to draw in the stitch just to give me ideas that I’m confident will work.
It’s amazing what you can do to keep changing the look of these stitches; the colour, the texture, the size and density of the stitch, working it in combination with other stitches or over applique, adding beads or layering another embroidery stitch over the top – but don’t forget the materials. Change them up too – sometimes the ideas just don’t stop.
And that’s the sweet spot! That’s where a textile artist really wants to be.
Here’s my process:

Image Credit: By Toby Hudson – Own work, CC BY-SA 3.0,
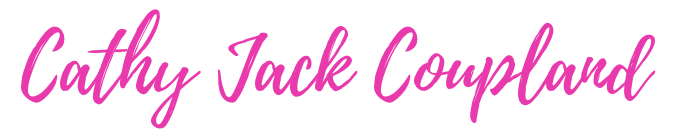
I look for an image and found the one above, noting the small outcrops of cylindrical shaped corals. These could be replicated using cotton buds.
 They are fairly easy to stitch into and can be coloured with pigment pens. Used one way they emulate a coral outcrop flowing in the currents. Turn them upside down and they are more rigid – like little soldiers, but still interesting.
Both can be topped with a sequin and a stop bead to produce a lovely textural grouping.
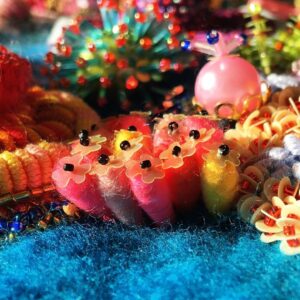
But this can be taken even further – the cotton buds could be covered with beads, embroidered using a straight stitch and a contrasting metallic thread or even laid down and stitched into a circular shape – like the spokes on a wheel.
But it doesn’t stop there. What about stitching them over a shape such as a piece of padded felt – that would give dimension and movement.
Then I found some dyed silkworm cases, padded them and used these as another means of introducing these faux coral-like shapes.
 So it’s not only stretching your imagination from the drawing to the stitches used, but it’s also stretching about how the materials can be used too.
And always, at the back of my mind during this process is ‘contrast’ – of line, shape, colour and texture – and that helps in the design process.
The ability to be able to look at an image, simplify, and draw it with the embroidery techniques in mind – once acquired, will stay with you forever.
Go design!