
The process is fascinating, so I’m sharing the process for my new embroidery, Radiant Bloom.
Radiant Bloom stemmed from my 100 Stitched Circles project self-set for 2025, where I’m working on 4″ hoop art to create 100 stunning embroideries.
This explores my design and embroidery abilities, merging traditional design motifs with a modern, dynamic interpretation.
I’m drawn to Deerfield embroidery, a very traditional style of surface embroidery normally stitched in shades of blue on a crisp white background, often characterized by sinuous, herbaceous designs featuring scrolling leaves, whimsical birds and beautiful flowers worked in a variety of textural stitches.
That was my initial inspiration.
So to set the scene for the creative interpretation, I’m delving into elements I love to work with: symmetry, colour, line, texture, contrast, pattern and repetition.
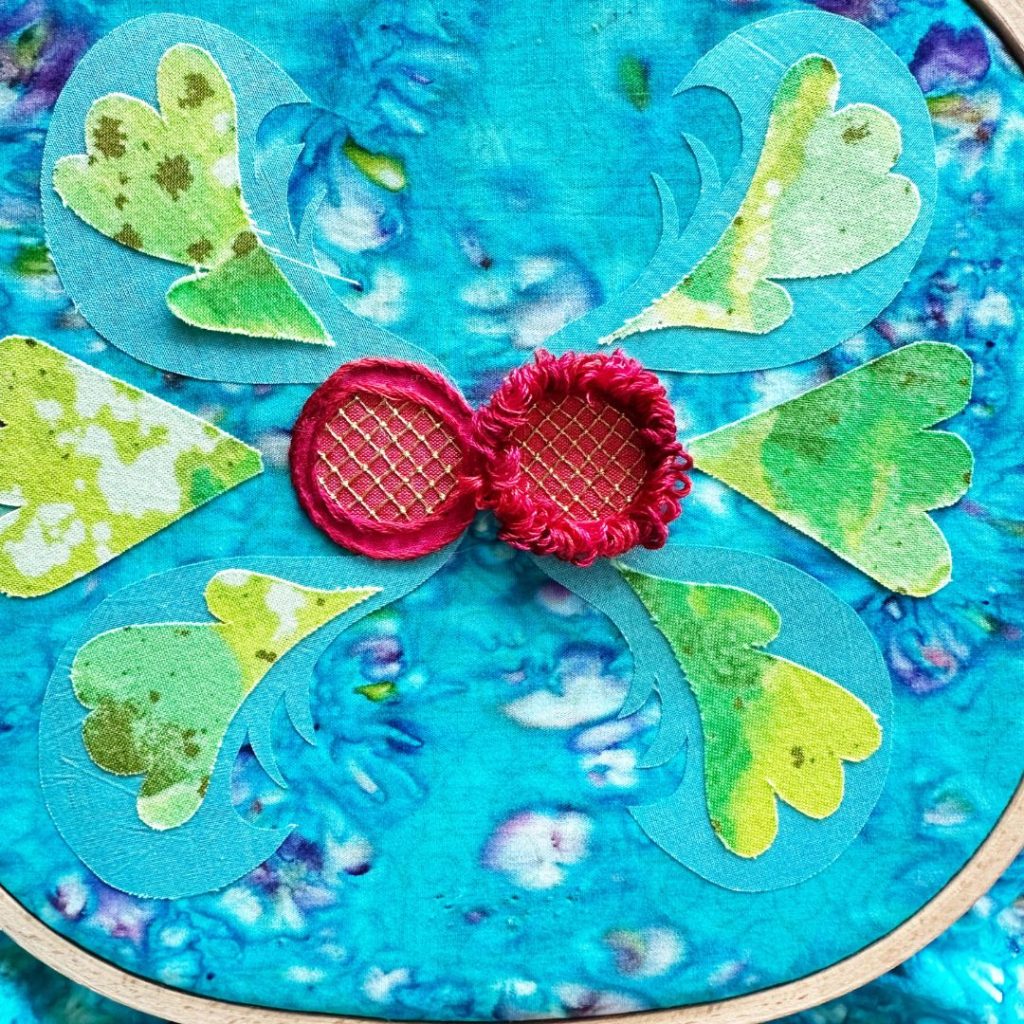
This is the beginning.
This piece was always meant to be completely over-the-top. There would be no holding back in terms of adding more on more, but it also had to embody the spirit of handcrafted excellence and the timeless beauty of embroidery.
Radiant Bloom was intended to reflect an intricate, finely crafted symmetrical design, incorporating a variety of textures, colours and embellishments, creating a visually dynamic piece that celebrates a harmony of materials and techniques in a unified design.
Craftsmanship, process and creativity are the holy trinity of embroidery. That’s what I intended to capture.
After numerous quick sketches, I selected motifs that could contain either embroidery or embellishments and that would work in a repeated, reflected design. These were changed to fit with my concept and to enhance the overall working dynamic of the design.
A square wooden embroidery hoop determined the size of the embroidery, so the design elements had to work within that configuration. I believe it’s a 10″ square hoop, which meant I could work the entire stitching without moving the ground fabric at all once it was hooped.
The design is not only repeated but also reflected or mirror-imaged, creating a very balanced, symmetrical basis, and while I had an outline of the design, every element of stitching along the way was a choice of workability, texture, contrast and colour.
The ground fabric is the backside of a long-loved patchwork fabric with a scrolling gold print on the front. I used the back because I felt the gold design would take away from the overall effect I wanted to achieve with the over-the-top embroidery and beading techniques.
Why did I choose this fabric? I love the colour, a bold deep sea blue batik style cloth with washes of purple and limey yellow smudges here and there. Every choice I made regarding colour was guided by that background fabric.
Embellishments include specialty sequins, beads, variegated stranded cottons, beading thread, hand-dyed cotton thread, black and gold Butterfly thread and a plain gold thread. The central focal point features a beautiful hand-dyed deep crimson silk thread that, when cut, produced a lovely soft, almost velvety effect. Vlisofixed, appliqued fabrics were also used to help add a movement of colour within the design.
I have a preference for working with a fairly long milliner’s or straw needle for embroidery, and I used fine beading needles for all the beadwork.
Working in a square hoop enabled a taught, tight tension on the background fabric that was stabilized with white acrylic felt, so the needle ‘pop’ was quite pronounced as it worked through the fabrics.
The appliqued and vlisofixed fabric motifs were ironed onto the ground fabric before hooping.
Stitches used were simple and included chain stitch, fly stitch, couching and trellis or lattice work. I simply used a looped stitch finished with a double stitch on the back to create the wonderful fuzzy effect in the two central flowers.
These stitches have historical significance. Chain stitch is one of the oldest and most widely known embroidery stitches, with evidence of its use dating back to Chinese embroideries from the 4th-3rd century BC and also found in ancient Egyptian textiles. The earliest known evidence of couching comes from 4th-century AD Egypt.
Trellis stitch, lattice work or square laid filling is one of my favourite filling stitches created by working a lattice of laid, long stitches, with each intersection held down by a tiny cross stitch. It’s very effective and looks exquisite when each square is filled with a tiny sequin and bead. It dates back to Jacobean crewel work of the late 16th and early 17th centuries.
The looping stitch used to create the central motifs was created by working a loop of thread over a small plastic tube, finished with two double stitches on the back. It was a matter of work, repeat, work, repeat, then cutting all those looping threads to create that amazing texture.
The sequin flowers are a wonderful textural and surprisingly softening feature of the embroidery, and were something I had never worked with before.
One of the attractions of this work is the repetition of motifs, but also of materials such as the sequins hugging each of the four cornered motifs and the beading both inside and on top of the two feather-like motifs.
The design took a while to come to life, but as each motif was enhanced with layers of stitching, highlighted with beading, the composition grew in personality. Here’s an image of the work nearing completion. What a difference!
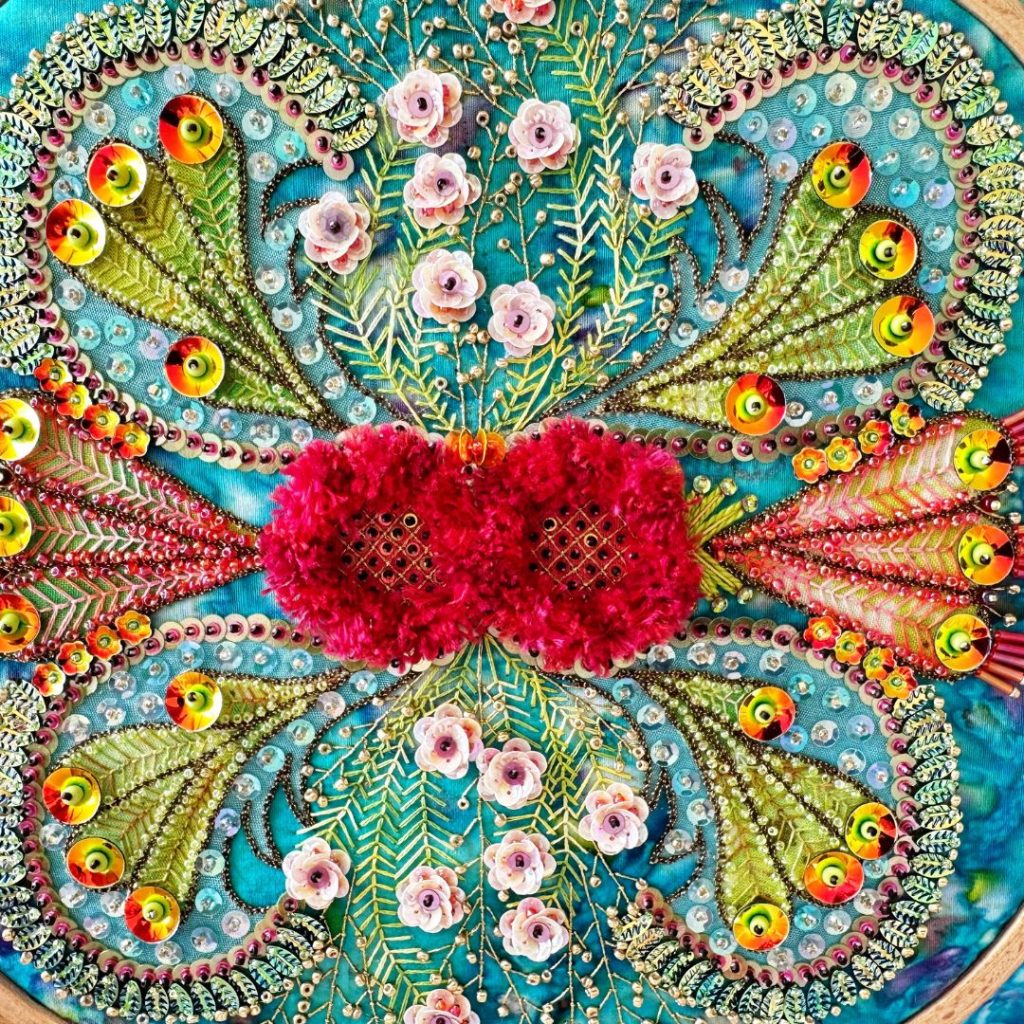
Repetition helps achieve symmetry, flow and unity across the entire composition.
It all sounds so easy, but I did have difficulties. Working with the black and gold Butterfly thread and the plain gold thread was not without its problems. The threads split easily and are best worked in shorter lengths to help avoid difficulties.
I was also unsure about the areas between the paisley-like motifs where I have worked the sequin flowers. I did work one side with a vine of crimson French knot berries and used the black and gold thread in between the spines of the flower stems, which I’d heavily beaded with lime green seed beads. None of these elements worked and were quickly removed, replaced by the simpler gold, beaded branches, allowing that entire space a chance to breathe.
Evaluation at every step was crucial, but sometimes you need to work on something to be ‘able to see it’ in situ. Then comes the decision about whether it stays or it goes. I made the right decision.
This entire work has been an experimentation with textures, colours and shapes, with endless questioning and analysis.
On reflection, I’m thrilled with how Radiant Bloom has evolved from initial idea to the completed artwork. It’s taken around four weeks of daily stitching, reverse stitching, thinking and trying to keep things tidy as I worked, and during that time we became Grandparents for the first time, so I’ll always look at this embroidery with great fondness.
This will make an eye-catching, one-off piece of wall art or become part of a collection of similar embroideries. It will also make a great teaching piece.
Some images are included here, but head over to my YouTube channel for a video of Radiant Bloom.
Let me know what you think. Reach out via my artist Facebook page or Instagram. I’d love to hear from you.
I hope this encourages others to share their process and images of their works-in-progress, so we can all learn and enjoy.
Happy stitching.

All views and opinions expressed are my own, except where acknowledged information is included from other sources.